
Autumn Catnip DIY Stuffies
09/10/20
Printer-friendly version
Fall is in the air! As the weather starts to cool, and we dig out our cozy sweaters, give your cat’s toy stash an autumnal feel with these DIY catnip stuffies. This is a great activity to keep little hands busy if you have kids at home, however as you’ll need either a sewing kit or hot glue gun, adult supervision is required.
WHAT YOU’LL NEED:

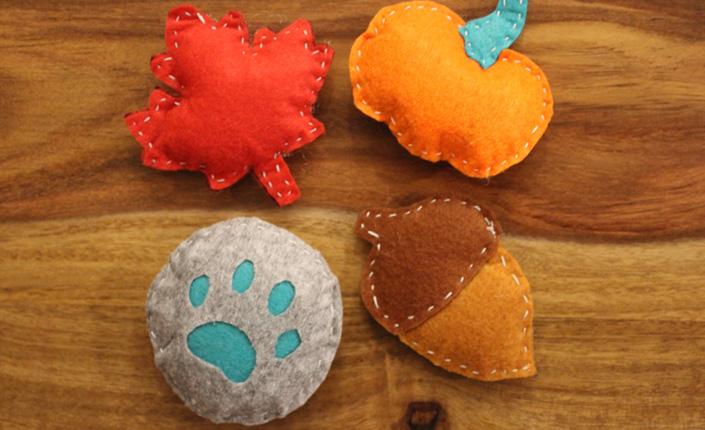
- Felt in a few assorted colours (we used red, orange, green, gray and two shades of brown)
- Scissors
- Sewing kit or a hot glue gun
- Marker
- Stencils (click here to download the ones we used)
- Stuffing
- Catnip
STEP 1: CUT, TRACE & REPEAT

- Cut out your chosen stencils
- Trace the outline of the stencil on to your felt
- For the pumpkin, leaf and acorn varieties, you’ll need to cut out two felt copies of each stencil
- For the paw print version, you will need to cut out one solid circle in colour 1, one solid circle in colour 2, and one circle with the paw print elements cut out in colour 1
STEP 2: START SEWING

- For the pumpkin and acorn stencils, line up the two sides of the base shape. Start sewing around the outer perimeter, leaving the top flap open so you can add your stuffing
- For the leaf, line up your felt pieces and start sewing the two sides together around the outer perimeter. Stop when you get about halfway around the leaf
- For the paw print, lay your solid circle in colour 1 down first, followed by the solid circle in colour 2, and lay the paw print cut out circle in colour 1 on the top. Line up the circles and start sewing around the outer perimeter, again pausing when you’ve sewn about halfway around the shape
- Note: if you don’t enjoy sewing, you can follow all of the above steps using a glue gun instead
STEP 3: STUFF & CLOSE

- Now that your shapes are partially sewn, stuff them with your filling and sprinkle in some catnip
- Sew the remaining edges closed
- For the pumpkin and acorn varieties, once the base shapes are closed, you’ll need to attach the tops. Place one side of the pumpkin stem and acorn top behind the base shape and line up the second side in front of the base shape. For the acorn variety, you can add some additional stuffing and catnip to the top. Sew all the way closed
STEP 4: ENJOY!

- Thoroughly inspect your new creations to make sure there are no loose strings or bits of glue hanging out. Trim as needed
- Gift them to your cat and let the fun begin!
- You can sprinkle some catnip on the outside or tie the stuffies to the end of a wand toy for added enrichment
- Always supervise your pet during play
Are you going to try these out at home, or have other ideas to share with us? Tag us with your creations @PetsPlusUs!